Facebook advertisers have an arsenal of tools for engaging their audiences, which is why Facebook takes up 38% of the entire online advertising revenue in the U.S., according to dcn.
Smart marketers are generating nearly $5 for every $2 invested. That’s impressive!

What’s more, Facebook is expected to keep growing.
What’s unique about the social media network is its ability to target referral traffic. Think about it, how much of your traffic comes from Twitter, Instagram, Pinterest, or Google? Are the expectations, needs, and behaviors of those web users different from each other?
Knowing the referral source could make it possible for you to create ads that cater more specifically to people in different demographics. But first off…
What’s Referral Traffic?
Referral traffic denotes the visitors that come to your website from other websites that aren’t finding you through search engines.
When someone clicks a link on a website or social network and is then taken to another website, then the tracking software installed on a website such as Google Analytics or HubSpot counts that visitor as referral traffic.
The originating website is called the “referrer” since it sends traffic from their website to the other.
Why Is Referral Traffic Important?
Referral traffic gets your website in front of new people, giving your website the opportunity to convert that visitor into a lead and then into a paying customer.
But that’s not all.
Referral traffic also extends its SEO benefits through people clicking on links or completing some type of social activity to order to visit your website. Google and other search engines consider these social signals and links as rank factors that are positive if they are coming from other trustworthy websites.
Sounds pretty good, right? Well, let’s get started on getting you some referral traffic so that you can start bragging about the hot leads that are rolling in…
How to Collect Parameters to Target Referral Traffic
Facebook Pixel is a tool that lets you create powerful audiences for ad targeting, run dynamic advertisements, monitor conversions, and optimize for those conversions.
Many marketers are quite slow to add Facebook Pixel because they feel intimidated. They incorrectly believe that they need to be a computer scientist or have coding experience. But while using the pixel may get technical (especially concerning setting up and understanding its parameters), it’s very easy to use when implementing it for its core purpose.
Let’s take a close look at a few unique procedures that allow you to set up the pixel efficiently and properly:
How to Find Your Pixel
Before we get to how to install Facebook Pixel, let us make sure that you can find it. To do that, first go into the Pixels page in your Business Manager. If you haven’t set up your pixel yet, it is going to look like this:
![]()
Then tap on the “Set Up Pixel” icon. If you had previously made a pixel but you want to find it to install it, click on the grey “Setup Pixel” button on top:
![]()
Everything you click here will depend on how your site is set up.
![]()
But for now, we are only concerned about obtaining the pixel. So, click on the second option that says, “Copy and Paste the Code.”
Within 1.2, you will see your pixel code:
![]()
The figures displayed in blue show the unique ID for your Facebook Ad account. The figures above are for a test account.
Now when added to your site, Pixel collects parameters together within the conventional PageView event. These parameters enable Facebook to collect things like article category, language, referrer, article tags, and much more.
Create a Website Custom Audience
Facebook Ads can be exciting, but if you do not understand what you are trying to accomplish or its benefits, then it can probably lead to some frustration. Keep in mind that a lot of people attempt to push sales or leads and ultimately fail because they are running ads for clicks or traffic and targeting the wrong audience.
Traffic, leads, and sales are not the same and neither are all audiences.
Here’s an example of an ad by Adidas. It’s effective for them, but it would not work for new businesses:

Adidas is a shoe company that spends a lot of money on awareness and recognition. But if you’ve got a small business, an ad like this could be a waste of your money. There is no call to action and no specific audience, hence sales won’t rise. This is simply to create awareness and stay top of mind to existing and new customers.
However, you can do more with a Custom Audience. Once you start collecting information via Pixel, you should be able to create Website Custom Audiences for these applicable groups:
- Login Status
- Post Category
- Post Tag
- Language
- Referrer
- Post Type
- Object ID
- Object Type
- User Agent
However, note that it might take one or two days to appear.
When developing a Website Custom Audience, you should see a menu for “From Your Events”. Under it, pick the “PageView” occasion:
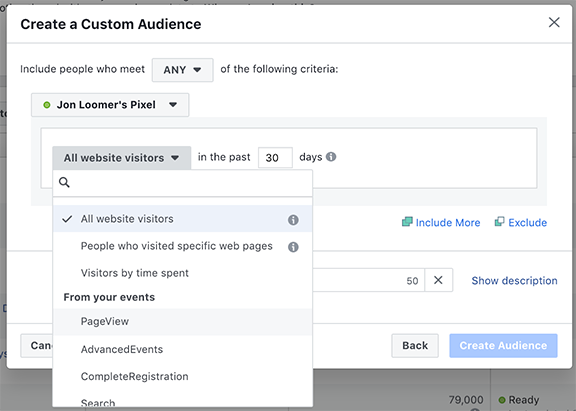
Then click on “Refine by” and then “URL/Parameter”:
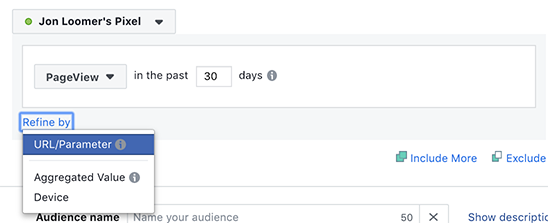
Click the drop-down on “URL”. You’ll see the parameter choices that you’re tracking. Pick “referrer.”
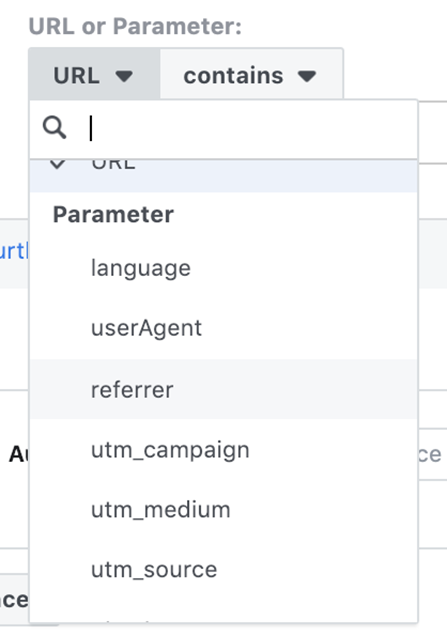
For example, you would like to make an audience of referral traffic from Google, choose “Contains” and input “google.com” under it:

Avoid containing traffic which only includes “Google” as it is possible that this will drive traffic which includes Google in a UTM or URL parameter. In these instances, it’s not guaranteed that it will be referral traffic from Google. Also, the domain differs depending on the country, therefore you might also need to include different variants of the Google domain, like google.co.au when monitoring traffic from outside the United States.
If you do not want to make Custom Audiences of referral traffic from Google and want to track from Twitter instead, don’t worry, it’s the exact same procedure. Just create your audience based on the Twitter domain.
The length you want to go to in tracking traffic is totally up to you. However, bear in mind the volume of traffic which you get when placing this is based on the referral source.
Different Method: Facebook Analytics
If you are well versed in Facebook Analytics, you can create a filter for referral traffic as well. However, you should have the ability to filter for lots of things which would otherwise be done with parameters. Then you can make a Custom Audience.
To start, tap the “Add Filter” icon on top of Facebook Analytics:

Then click on “Create new filter”, “matching web parameters”, then “Referral Domain”. Next click on “contains” and “google”:

In the upper right corner click on the quotations “…” and choose “Save Filter”:
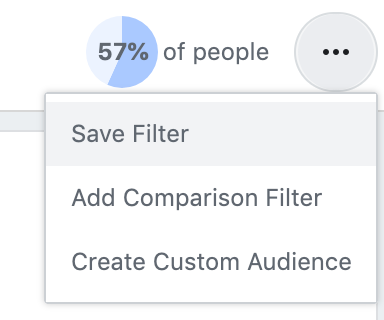
After saving the filter, return to the same menu in the top right and choose “Create Custom Audience”:
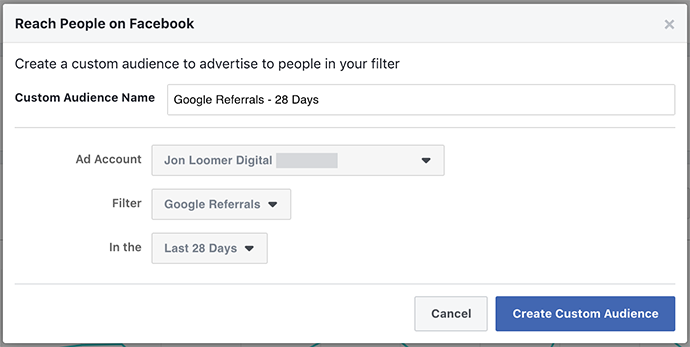
Targeting Referral Traffic
Now that you have made the Website Custom Audience for referral traffic, you can finally start monitoring these individuals who are interacting with your business. To see them, check within the advertisement set and enter the title of the audience you just created:
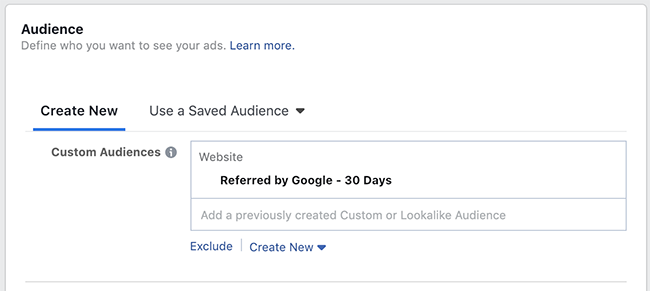
You might want to use the worldwide setting, but it is up to you. You most likely know the type of volume you get from such referrals. For instance, is there something unique that users search for when they come to your site because of a referral? If so, they can be served a targeted ad that speaks directly to them.
How to Maximize Facebook Ad Campaign
However, it’s important to understand your targets before you spend any money on a Facebook Ad campaign. There are three types of ads/goals to have:
1. Awareness
In this phase, you are teaching web users about your brand with the goal of being recognized by potential customers.
2. Consideration
You are beginning to acquire leads when you reach the Consideration stage and should collect contact information to continue the conversation with your potential customer.
3. Conversion
Here the potential customer has taken some kind of action, like starting a free trial of your software or purchasing your product. Only you know which of these goals are important to your company and which category your ad belongs too before you start a campaign. And it might change as your brand grows.
Facebook offers goals in these three classes to you when you set up an ad campaign:
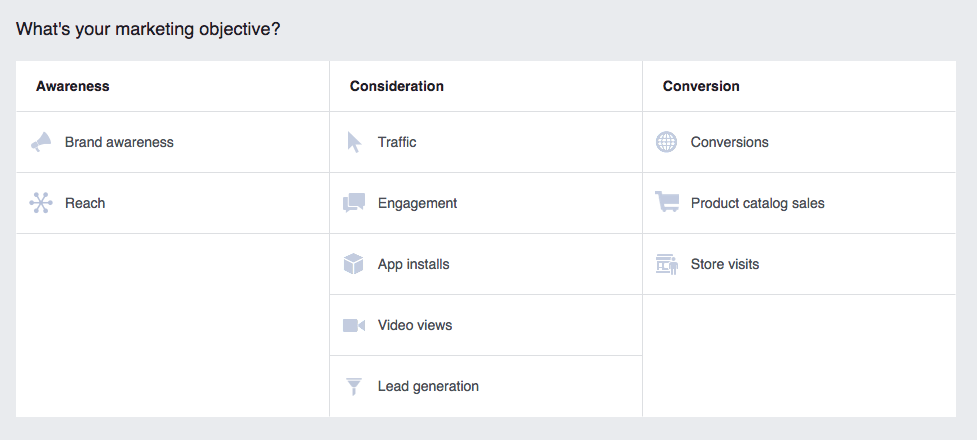
Choose the objective which makes the most sense for your strategy. Paying attention to these metrics below also will help determine if the ads are going according to your plan:
Conversion speed
This is the proportion of individuals who perform the activity you desire. It can include purchasing a product or simply subscribing to an email list.
Frequency
This lets you know how often your ads are displayed to users. After a while, they lose their efficacy and are ignored by users, so this is an important metric to pay attention to.
Ad Spend
This metric helps ascertain whether you’re making your money back on advertisements.
CTR and Cost Per Click
This is the proportion of people who click the ad. It is distinct from conversion rate because not all clicks lead to purchases or sign-ups.
Price per activity
This reveals to you how much it costs to make a sale or convert a lead. Knowing this can help you effectively price your ads.
Now, it’s easy to be fascinated by other numbers such as how many people see your ad. But bear in mind, this is useless if you are not reaching your target. With that said, let’s get into the fun part: testing!
Set up a Method for Analyzing Data
In order to be successful with your advertisements, you should constantly be testing and monitoring your ads. Testing your ads is even significant enough for Facebook itself to advocate for it.
However, the problem is that Facebook is not that great for testing. The interface works fine for a few types of advertisements, but it can get too intricate and confusing if you start running a lot of ads simultaneously.
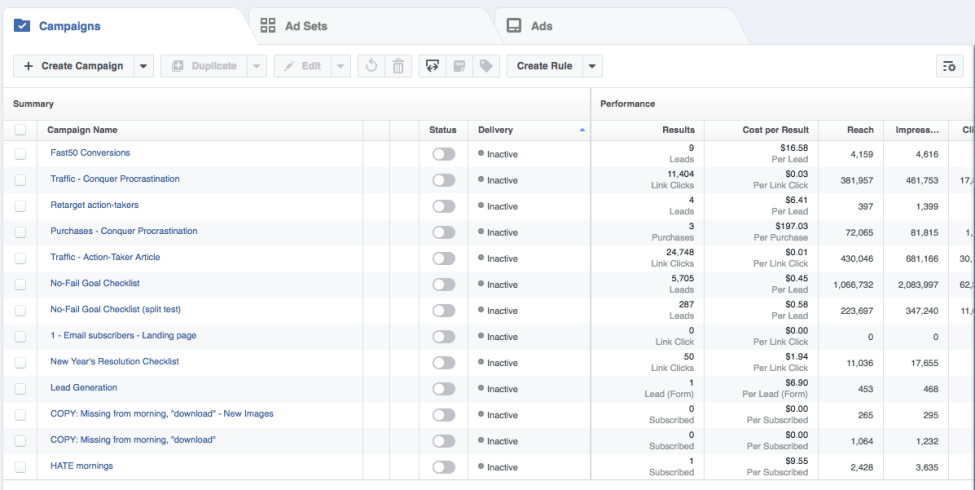
Instead of spending a great deal of time trying to understand and monitor it, use AdEspresso.
This gives you easy-to-read information on the outcomes of a set of split tests.
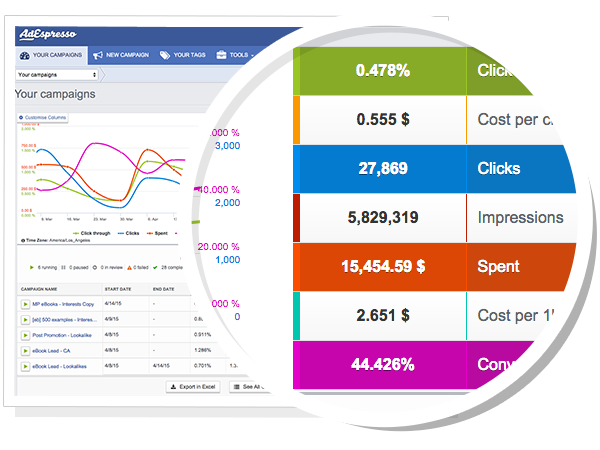
Running advertisements that are ineffective is expensive and a waste of time, whereas AdEspresso can save you thousands of dollars if you’re running lots of Facebook Ads.
To begin, click on the “Start Your Free Trial Now” icon.
After you create an AdEspresso account, connect it to your own Facebook account.
Connecting AdEspresso to Facebook
For it to work, your account must be linked up for you to be able to manage your own adverts and get statistics. You’ll be prompted before you proceed to add your Facebook account immediately you sign into AdEspresso by following these steps:
- Click “Insert Facebook Account”.
- If you’re not already signed into Facebook, enter your FB login credentials (email and password).
- Click “Proceed as” (profile name).
- Click “Choose what you allow”. If you don’t need AdEspresso to import all the Facebook Pages, then here’s where you determine what the Facebook user gets access to.
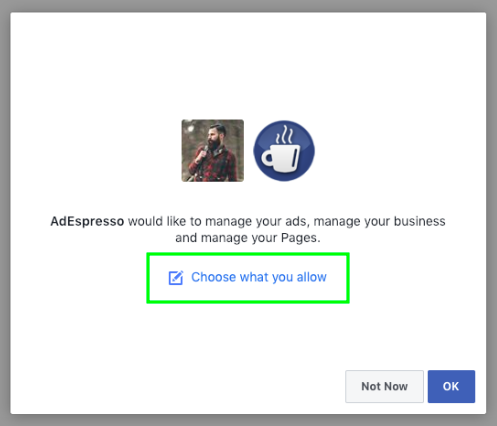
5. Uncheck the boxes beside the Page that you don’t want to be imported into AdEspresso.
The rest of the toggles for permitting ads and company manager accessibility must stay enabled so that AdEspresso can publish your advertisements to your Facebook ad accounts and Pages.
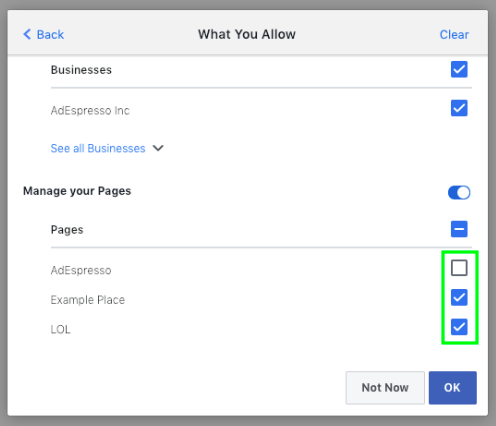
6. Click OK.
7. Click on the boxes to the left of the Facebook ad account(s) that need to be handled in AdEspresso.
8. Then click “Insert Facebook Ad Accounts” and make your first campaign!
Conclusion
Targeting referral traffic is vital to maximizing the full potential of your Facebook ad campaign.
It is often neglected, but it shouldn’t be. By following the steps described in this article, you should not only be able to create a Facebook ad campaign targeting referral traffic but also run your ad campaign effectively to gain the best results and ROI.
This is why referral traffic matters because you aren’t just showing off your products to random web users but to users that have displayed an interest in certain products and behave in a certain way.
This makes your targeting much more accurate. How awesome is that?
If you have questions or run into any issues with your Facebook advertising campaign, check out Cardinal’s Social Media Services and shoot us a line today!

